Friday, August 31, 2012

Crazypotato98’s Saffron Chicken and Brown Rice

The bell peppers mix beautifully with the delicate flavors of saffron to create a unique dish your family will love. The nutrition facts were designed at Calorie Count.

Saffron threads
Saffron Chicken and Brown Rice

Ingredients:

2 chicken thighs, skin removed
2 tsp white pepper
1 red bell pepper, chopped, seeded
1 yellow bell pepper, chopped, seeded
¼ onion, minced
1 clove garlic, minced
1 tsp saffron
0.21 oz {2 cubes Knorr chicken bouillon}
1 cup brown rice
4 cups water

Directions:

Remove skin from chicken. Brown about 5 minutes per side in a skillet or wide cooking pot (you can use cooking spray so that it will not stick). Remove chicken and keep warm.

In the same pan or pot that you used to brown the chicken (in the chicken drippings), saute the onion, garlic and bell peppers until soft. Add bouillon, water, brown rice and saffron. Add browned chicken and cover pot or skillet. Heat until boiling, then simmer for at least one hour or until chicken falls off the bone and rice is completely cooked.

Serve warm.


Sunday, August 26, 2012

Marie’s Simply Canned Stewed Tomatoes

Marie’s Simply Canned Stewed Tomatoes

Ingredients:

A bunch of tomatoes! It all depends on how many jars you want to make.
Canning jars and lids
1/2 tsp canning salt per jar
Celery and onions to taste

Directions:

Wash tomatoes, and cut core out of tomatoes. 

Blanch until skin cracks and starts to peel.

Cool and peel completely. 

Put into jars. 

Add 1/2 tsp canning salt and as much sliced celery and onions are  you would like.

Seal and place in cold packer, bring to a boil for 15 minutes. 

Remove with canning tongs and cool.

Canning tongs? See the pic to the left and to see some more, click this link. Regular tongs won’t do. If you will try your hand at canning, get everything you need! Canning tongs are very inexpensive.

Friday, August 24, 2012

Marg Makes Canning Easy

This is the technique Marg uses when she makes her fantastical Summer Tomato Sauce. Enjoy and read the directions through to the end before you even think about starting. Do take great care as boiling water plays a dominant role. Keep all the young ones safely occupied elsewhere.

You’ll need:

pint or quart mason jars with lids (rings and seals—you can reuse the rings from year to year, but never reuse the seals, buy new ones)
water bath canner
jar lifter, canning funnel, ladle, tongs
a saucepan
old towels

What to do:

Fill the waterbath canner with water and start heating it on the stovetop as you’re nearing the end of the cooking of your sauce. You will need the water boiling when you start processing, and it takes a while for all that water to reach boiling point, so start this early!

You will need to sterilize jars and lid seals to prevent spoilage. Put the seals in some water in the saucepan and bring the water to a boil; keep water simmering throughout. Also rest funnel and tongs in the boiling water to sterilize them until you’re ready to use them.

You can sterilize the jars 2 different ways. You can run them through the dishwasher just before you’re going to fill them (keep the door shut when you’re not removing jars), or you can put them in the boiling water in the waterbath canner and leave them a few minutes. In both cases remove a jar just before you’re going to fill it.

Place the canning funnel in the sterile jar and ladle in sauce, leaving 1/2 inch of headspace at the top of the jar. This is important. Remove funnel, carefully wipe any drips off the rim of the jar with a clean cloth or paper towel, lift a seal from the saucepan of simmering water with the tongs, and align this, rubberized ring side down, on top of the jar. Screw a ring lid over this finger tight only—you don’t need to really tighten the ring. The screw lid is meant to hold the seal lid in place, nothing more. It’s the flat seal lid that will be forming the seal.

Place the filled jars in the wire tray that comes with the waterbath canner (most canners hold 6-7 jars in their wire trays). DO NOT put the jars in the tray elsewhere and carry it to the canner; rest the tray inside the canner, keeping it above the water using the handles that are designed to hook on the edges of the canner. Once it’s filled, carefully lower the tray full of jars into the boiling water. Be careful of your fingers, this is boiling water! The tops of the jars should be covered by 1 inch of water. If they’re not covered by enough water, add more hot water. Also be careful that there isn’t too much water—keep an eye on the water level in the canner as you lower in the full tray, and if necessary scoop out some of the water so it doesn’t overflow. Fold the wire tray handles in just a bit so that the lid will fit on the canner.

Bring the water back to a boil and, once it’s boiling again, set your timer. Process pint jars in the boiling water for 35 minutes. Process quart jars for 45 minutes. Don’t overprocess or you could overcook the contents; don’t underprocess or you’ll risk unsealed jars and contamination.

Lay an old towel on a nearby counter. This is where you will be setting the hot jars for cooling after they’ve been processed.

When the jars are done processing, remove the canner lid and carefully nudge the handles on the wire tray back upright (use a fork or tongs if they’ve dropped into the water), then lift the tray and hook the handles on the edges of the canner. Using your jar lifter, grip a jar around its shoulders just below the lid and lift it out of the canner. Support the bottom with your other hand (covered by a towel or an oven mitt; towels are better because things are going to get wet!) while you move the jar to the towel you’ve spread on the counter. Leave 1-2 inches of space around each upright jar, for air flow and cooling.

When a jar seals, you will hear a pop. When it is sealed, the lid will be slightly concave and when you touch it with your fingers, there will be no give. If a jar is not sealed, the lid will be convex (very slightly raised) and when you press with your fingers, you will feel some movement. If a jar doesn’t seal, put it in the fridge when it’s cool and eat it within a week or so.

Once the jars have sealed and are cool, store them in a cool place. Canned sauce will keep a year. DO NOT eat contents that smell when you open the jar, if there is mold, or if there is any suspicion that they may have spoiled. Throw away spoiled contents. Often, you will have to pry the seal lid off a sealed jar of sauce with the edge of a spoon. You’ll likely hear another pop when it comes loose. This means there was a good seal.

You can reuse the jars and ring lids year after year as long as they’re still in good condition. Always get new lid seals. 

This process is much the same for many different types of fruits and vegetables; only the processing times will differ. Find the proper processing times and any requirements for different fruits or veggies (e.g., hot pack or cold pack, altitude) on the Internet.

For safe canning to prevent botulism, low acid foods need to be processed in a pressure cooker instead of the water bath canner.

Marg’s Summer Tomato Sauce

The directions below are for two servings-- I multiply batches and can the extra. What's the point of 2 measley servings? Today's canning session was 14 batches, using half a bushel of fresh roma tomatoes.

Adapted from this recipe (nutrition facts in the recipe link). Great way to use up all those fresh tomatoes, basil, and oregano in August.

The wine and paprika cut the sweetness of the tomatoes and leave just a zesty tomato taste.

14 batches from a full day of canning!
Summer Tomato Sauce

Ingredients:

3 cups tomato
1/4 cup red wine
1/2 cup onion, chopped
4 cloves garlic (small; 2 cloves if big), minced
1/4 cup kalamata olives, pitted and chopped
2 tbs fresh basil (1 tbs dry)
2 tsp fresh oregano (1 tsp dry)
1/2 tsp paprika
1/2 tsp salt or to taste
3 tbs parmesan (fresh)

Directions:

Blanch and peel the tomatoes, or use canned tomatoes. Puree 8 at a time in food processor and put them in a stock pot. Start heating.

That's one thick sauce!
Add wine, paprika, and onion and cook until onion is soft.

When water has mostly evaporated from the tomatoes add the garlic, olives, basil and oregano and heat through.

Stir in parmesan and serve over capellini or shell pasta. 

When I can the sauce I add the paremesan when I'm serving it, not before.

Thursday, August 23, 2012

Sharpshootinstar's Gang Gai (Coconut Chicken)

This is a recipe for a Thai coconut curry that is one of my most favorite foods in the world.  I'll include brand names where I can, to make ingredient hunting easier.

Gang Gai (Coconut Chicken)
Nutrition facts for 9 one cup servings

Ingredients:

2 lbs boneless skinless chicken, cubed
1 tablespoon coconut oil
1 can coconut milk
1-2 tablespoons Thai Kitchen Fish Sauce
1-3 tablespoons Thai Kitchen Red Curry Paste
1 cup broccoli florets
1 cup red peppers, diced
1 cup green peppers, diced
Cooked rice or riced cauliflower, if desired.

Directions:

In a large skillet over high heat, melt the coconut oil, then add your chicken.  Once it is cooked and starting to get lovely brown bits, pour in your coconut milk, fish sauce, and add your desired amount of curry paste.  Next add your veggies and allow it to come to a brief boil, then reduce heat and simmer for about 20 minutes. 

That's it!  Serve over rice or riced cauliflower and enjoy with a Thai iced tea.

Thai Kitchen products are everywhere! Learn about them at their website and then find them in your store.

Wednesday, August 22, 2012

Sharpshootinstar's Vegetable Lentil Dal

This is a delicious and simple hearty vegetable stew that gets a decent dose of protein from lentils.  I also used it as a way to get rid of some of my abundant zucchini crop. Even more delicious when there's a chill in the air!

The nutrition facts were created at Calorie Count!

Lentils!
Vegetable Lentil Dal

Ingredients:

3/4 cup dry lentils
4 cups vegetable or chicken stock
1 cup onion, chopped
1 cup carrots, chopped
4 cups zucchini, chopped
1 tablespoon olive or coconut oil
1/2 to 1 teaspoon curry blend of your choice.  I prefer S&B Oriental Curry Powder for this. It's a sweeter yellow blend that works very well with most vegetable dishes, and is found in the asian foods section of the grocery store.

Directions:

To prepare the lentils, soak them in water for twenty minutes to half an hour, drain and rinse, set aside.

Set a large pot over medium-high heat and add your oil.  Next add all your veggies.  You don't really want to saute them, but sweat them.  Allow them to cook in the oil for ten to fifteen minutes, then sprinkle on your desired amount of curry powder, add the lentils, and carefully pour in the stock.  Give it a stir to combine, then cover and bring to a boil.  Once you've reached a boil, reduce heat and simmer for about an hour on low, stirring once in a while. 

I like this served over chunks of roasted sweet potatoes.  Enjoy!

Tuesday, August 21, 2012

Marg's Pomodoro Sauce

This is a thin sauce, but so very flavourful! The balsamic vinegar is the ingredient that adds the flavour. Makes 12+ generous servings; I freeze it in empty yogurt tubs that hold roughly 4 cups each, and I get enough to fill 4 yogurt tubs with about a cup left over for the cook's portion for dinner that night. ;-)

The nutrition facts for this delicious sauce were designed at Calorie Count.

Pomodoro Sauce

Ingredients:

1/2 cup olive oil
2 onions, chopped
16 cloves garlic, minced
8 cups roma tomatoes, chopped
1/2 cup balsamic vinegar
5 cups chicken broth (I just use a box of the broth [eg Campbell's, Knorr] from the supermarket)
2 chicken bouillon cubes (I use McCormick chicken flavoured All-Vegetable bouillon cubes, but that's just me)
1/4 tsp red pepper flakes, ground (or 1/8 tsp cayenne)
1/4 tsp black pepper
2 tbs dry basil (or 4 tbs fresh)

Directions:
Blanch the tomatoes by placing them in boiling water until you see them start to split. Carefully remove from the water with a scoop and cool a bit. in some cold water The skin will then slip right off.

Pulse tomatoes, about 8 at a time, in food processor to chop roughly.

Pulse garlic in food processor (after washing it out) until finely minced. 

Chop onions.

Heat oil in a stock pot, then add onions and garlic and cook until tender, stirring occasionally.

Add tomatoes, vinegar, broth, and bouillon cubes, bring to a boil, turn down heat, and simmer for about 15 minutes.

Stir in red and black peppers to taste and the basil.

Simmer until about an inch of the liquid has evaporated off and sauce is getting thicker, about 45-60 minutes.

Let cool a bit, then puree with an immersion blender.

Serve over pasta and top with grated Parmesan or ladle into tubs and freeze for fresh tomato sauce all winter long!

Wednesday, August 15, 2012

Crazypotato98's Vegi Soup with Bob's Red Mill Mix

Made with a nice little dry mixture of green split peas, yellow split peas, barley, lentils and vegetable pasta (semolina wheat flour, dehydrated spinach and tomato - no added salt!). Keep a pack of Bob's Red Mill Vegi Soup Mix in your pantry and you will be ready to create a new soup using any season's vegetables.

The nutrition facts for this simply delicious soup were designed at Calorie Count.

Vegi Soup with Bob's Red Mill Mix

Ingredients:

7 cups water
4 cubes Knorr tomato bouillon
1/2 lb frozen green beans
12 oz can diced tomatoes, drained
5 oz broccoli slaw

Directions:

Dump it all in a pot, simmer an hour, and enjoy!

Sunday, August 12, 2012

Sheila’s Seafood Stuffed Portabellas

The nutrition facts for this delicious dish were designed at Calorie Count!

Sheila’s Seafood Stuffed Portabellas
Serves two

Sauce Ingredients:

¼ c low fat mayonnaise
1 T lemon juice
1 T water
1 garlic clove minced
Dash hot pepper sauce

Sauce Directions:

Blend mayonnaise, lemon juice, garlic and hot pepper sauce. Cover and refrigerate. This allows time for the flavors to blend

Stuffing for the Portabellas:

227 g imitation crab (or lobster or shrimp)
1 egg
1 T low fat mayonnaise or sour cream
½ t Worcestershire sauce
2 T shallots, diced
2 T parsley, fine chop
¼ cup seasoned bread crumbs
Dashes of hot pepper sauce to taste

Directions for Stuffing:

Finely chop the seafood and in a small bowl mix with egg, mayonnaise, Worcestershire sauce, shallot, parsley, and bread crumbs. Mix in hot pepper sauce if using.

The Mushrooms:

2 portabellas or 4 cremini mushrooms as big as a loonie (a Canadian coin that indicates the mushroom is large enough to hold some stuffing

Prepping and Filling the Mushrooms:

Remove stems from mushrooms and scrape off the brown gills with a spoon. Place rounded side down in shallow baking pan and fill with stuffing, mounding as necessary.

Topping:

2 T Parmesan cheese

Sprinkle with cheese.

Bake:

400°F (200°C) oven for 15 –20 minutes or until heated through out.

Drizzle with aioli sauce and serve.

Slightly modified from this recipe

Suchit Approved Mushroom Tom Yum

A delicious Thai soup that Suchit cooked for me on a number of delicious occasions. Lucky me! The nutrition facts were designed at Calorie Count.

Oyster mushroom
Mushroom Tom Yum
2 Servings

Soup Toppings to be added at the table:

2-3 crushed Thai chili peppers (or jalapeno)
5 sprigs chopped cilantro
1 tomato
3 scallions
1 lime

Soup Ingredients:

1 crushed lemongrass
1/2 lb Oyster or Enoki Mushroom (see pics)
2 1/2 cups water
2 kaffir lime leaves*
2 tablespoons fish sauce
Optional: galanda**

* if you cannot find kaffir lime leaves, don't worry. The soup is good without it, but you might want to squish in more lime. You don't eat kaffir lime leaves, they are for the making of the soup stock. Look for it in an Asian supermarket. This is a plant you can grow in a pot. The link tells you how.

** galanga is similar to ginger, but tastes more of pepper (it's from the same family, but tastes different). Use it in the way you would ginger, peel and either crush or slice. Add to the recipe with the lemongrass. An Asian supermarket is your best bet for finding this too. Remember, it is similar in appearance to ginger.

Enoki mushroom
Preparation:

Clean a stalk of lemongrass, removing the outer layers. Use only the bottom 4 inches of the stalk. Crush the lemongrass with the back of your knife or a meat tenderizer – this opens the plant’s cells to flavor the stock. Tie the lemongrass into a knot (this makes it easier to remove).

Wash the mushrooms, pat dry, slice into spoon sized pieces if using oyster mushrooms and if using enoki, let them remain in long threads as if they were noodles, and set them aside.

Remove the leafy part of the kaffir lime leaves and discard the stem.

Crush the chili peppers, chop the cilantro, tomato, scallion, and make wedges with the lime. Place each in a separate serving bowl and set on the table.

Instructions for optional galanga

Cooking the Tom Yum:

Add the water to a large pot and bring to a boil. Add the lemongrass knot, kaffir lime leaves, and galanga (if using) to the water. Boil for a 30 minutes. Remove lemongrass and kaffir lime leaves.

Add the cleaned mushrooms and fish sauce.

Simmer for about 15 minutes.

Taste. If everyone eating the soup loves spicy food, you could add the chili paste and let everyone adjust it upward with the sliced chilis at the table. Flavor can be adjusted with fish sauce, lime juice, or chilis.

Serve Tom Yum piping hot with the assorted toppings.

Optional:

During the final 10 minutes of cooking, add fresh shrimp – peeled, deveined, and sliced smaller if necessary so you can spoon them up.

Friday, August 10, 2012

Marie's Crockpot Mushrooms

Stressed with party preparations? This is one appetizer that can handle being left alone.

The nutrition facts were designed at Calorie Count.

Marie’s Crockpot Mushrooms
serves eight

Ingredients:

16 oz fresh mushrooms, cleaned and trimmed but left whole
1 envelope Ranch Dressing Mix
8 T Butter

Directions:

Put everything in a crockpot, stir well and heat on high for one hour.

Super good appetizer!


Kathe's Enhanced Mushroom Chicken

Aromatic and savory with a hint of citrus, this elegant dish pairs beautifully with a simply dressed salad and a glass of white Burgundy. Enjoy.

The nutrition facts were designed at Calorie Count!

Kathe's Enhanced Mushroom Chicken or Poulet de Paris aux Champignons

Ingredients:

Serves 4 with leftovers (if you’re lucky)

1 pound chicken breasts (or 6 to 8 chicken parts of your choice – a mix of legs, thighs and breasts is fine. The calories were set using chicken breasts.)
1 8 oz package fresh white or brown mushrooms or a mix of the two
2 onions (white or red), sliced or cut into chunks
1 clove garlic, minced, or more to taste
1 tbsp. olive oil
½ cup orange juice
1 tbsp apricot jam
1 tbsp Dijon mustard

Preparation:

Slice onions. Mince garlic. Slice mushrooms into uniform pieces.

Cooking:

Pour a little olive oil into the bottom of a large frying pan and heat on high setting. Sauté onions for a couple of minutes, then add garlic and keep stirring. Reduce heat to medium. When onions and garlic start to turn brown and smell wonderful, add mushrooms and continue cooking, stirring to make sure they don’t cook too quickly and burn.

Add a little orange juice and keep stirring. After about 5 minutes, move onions/mushrooms to side of pan and place chicken pieces in the middle of the pan, adding thickest pieces first. Sauté until brown. Turn over and brown on other side. You may need to add more orange juice. Blend in apricot jam and mustard and stir well.

Leave everything to simmer together for about 20 minutes or longer until chicken is cooked through (prick with a fork to make sure juices run clear). This will allow flavours to blend. Cover with lid or foil if you’re still working on the rest of the meal.

Serve with rice and vegetables and/or salad.

Note:

For a delicious variation and to make it an all-in-one dish you can throw in hand fulls of spinach about 3 minutes before it's done.

Tuesday, August 7, 2012

Artisan Treats and Petit Amuse: a Review


There's a new way to taste and buy gourmet deliciousness via the internet!

Petit Amuse explores interesting little shops around the world on a never ending quest to find and eat only the best small batch artisan treats - the kind you won't find at most groceries. You eat right along with them for a low monthly membership fee ($10) when a collection of treats arrives at your home all wrapped up in a little surprise box of deliciousness. Although you are not obligated to buy anything at all, you might find yourself very tempted to do just that.

How can one say no to the request to eat and review good food? My box came in the mail the other day.

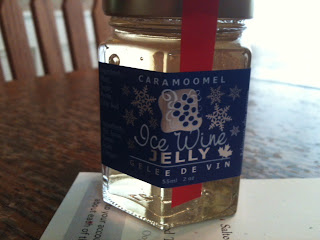
This is was what I found inside: a jar of Ice Wine Jelly, one Garukabar, one Cha-Chas, one Salted Rosemary Shortbread, and a bag of Sun Dried Tomato & Parmesan Popcorn made by a company named Oogie's.

I assembled my most experienced Tasting Team (Husband, Son, and Daughter), set up the scientifically precise dessert plates with glasses of cold filtered water for cleansing the palate between tastes, and positioned paper and pencil in anticipation of making learned and quotable comments.


Menu Card

I very much liked the thoughtfully designed menu card.

The reverse side of the card detailed the ingredient list for each item in nice reasonably sized print.

No squinting and peering at tiny little labels required. No reading glasses needed. Nicely done.


Ice Wine Jelly

Yes, jelly made with Eiswein, the dessert wine that is made when a freeze occurs before the grapes are harvested... and before they rot on the vine. Freezing intensifies the grape's naturally sweet flavor and makes for some pretty dratted awesome wine.

If you like sweet spreads (and this was very sweet), this jelly will rock your socks. The jelly clearly tastes of wine and was delicious spread over a piece of bread.


Salted Rosemary Shortbread

This was a major hit with all four of our tasters, even the more dubious member of my staff ("Shortbread and rosemary???!!!"). The savory rosemary and salt were perfectly balanced by the not too sweet shortbread.

Well done, this is one treat we would buy.


Cha-Chas

Oh, how I wanted to add an extra Cha on to the name.

This looked so awesomely dark chocolatey that we could not wait to try it. The flavors were superb. Unfortunately, the texture did not match the standard set by the flavor or the anticipation. It was a little dry and hard, and all tasters agreed that was disappointing.

One nice thing about sampling this cookie via Petit Amuse is that we did not waste money on an entire package purchased at a store.


Garukabar

If nothing else, the names of these treats were great fun.

For this bar, think backpacking in Colorado Rocky Mountain National Park. You've stopped to sit on a large flat rock and enjoy the sights and sounds of rushing white water cascading over a particularly gorgeous collection of fallen boulders. You sip from your Earth friendly refillable water bottle and open a chewy Garukabar. The bar's recyclable brown paper wrapper encloses an amazing amount of hiker health with its natural grains, seeds, dried fruit, honey, and brown rices. Fortunately you also brought along a small handkerchief which you dip into the icy cold river and use to dab off the sticky gooey goodness from your fingers after carefully stowing the wrapper in your backpack so as to leave the view as you found it - unsullied by man.

Oogies, Sun Dried Tomato and Parmesan Popcorn

The was definitely the hit of the day. We finished every little kernel of the perfectly seasoned non-GMO popcorn. What's not to love here?

Would we buy more? Absolutely. Hopefully it is available in very large containers so we can stock up.

Is a monthly membership worth the cost?

Tasting Team members huddled and compared notes, debated and wrote copiously as they analyzed each experimental morsel. We then correlated value with epicurean delight in an abundance of colorful pie charts. Does Petit Amuse have what it takes? Does it deliver what it says - good value and a fun foodie experience? Absolutely. Excellent premise, reasonable price, with fun and deliciousness delivered right to your door.

Monday, August 6, 2012

Hawaiian Hamburgers

The nutrition facts for this tasty burger were designed at Calorie Count.

Hawaiian Hamburgers

Ingredients:

1 pound ground beef, extra lean
1 onion, chopped very fine
2 t garlic, chopped fine
1/2 C soy sauce, low sodium
1 t garlic, chopped
1/2 t ground ginger

Directions:

In a large bowl, use your hands and mix beef, onion, and 2 t garlic.

Shape into six patties. Lay flat in a pan (one with a side).

Mix the soy sauce, 1 t garlic, and ginger. Pour over the hamburgers and allow to marinate for at least 30 minutes. Turn once to make sure both sides get a good soaking.

Grill or broil until done - approximately 5-7 minutes on each side.

Serve on a bun. For a fun Hawaiian kick, top each burger with a slice of pineapple!

Sort of Spanish Meatballs

The nutrition facts for this vaguely Spanish dish were designed at Calorie Count!

Sort of Spanish Meatballs
four large servings

Ingredients for the meatballs:

1 pound ground beef, extra lean
1/4 C bread crumbs, unseasoned
2/3 C onion, chopped
2/3 C evaporated milk
Optional: pinch of salt

Directions for the meatballs:

Preheat oven to 375 F

In a large bowl, mix everything except the butter. Use your hands and get into the mixing. Shape into 12 meatballs. Spray non-stick spray in a baking pan and bake the meatballs until they are just done, approximately 25 minutes.

Ingredients for sauce:

1 T olive oil
1/4 C green pepper, chopped
1/4 C onion, chopped
28 ounces tomatoes, chopped, canned is fine
1/2 C stuffed olives, sliced
1/4 t black pepper
1 t garlic
1 t paprika
pinch salt
1/8 t crushed red pepper
2/3 C water
1 6 oz can tomato paste

Making the sauce and putting it all together:

In a large pot, heat the olive oil over medium. Add the green peppers and onion. Saute until they soften but do not brown.

Add all the rest of the ingredients and bring to a simmer.

Carefully place the cooked meatballs in the cause.

Cover and simmer on low for about 30 minutes. Taste and adjust seasonings.

Serve with cooked rice.

Laura’s Italian Chicken Breast Salad

The nutrition facts for this satisfyingly delicious salad were designed at Calorie Count.

Laura’s Italian Chicken Breast Salad
serves 4

Ingredients:

1 cup halved cherry tomatoes
2 small zucchini, sliced thin & cut into half moons
1 cup diced fresh mozzarella cheese
1/4 cup olive oil
1/4 cup balsamic vinegar
sea salt/cracked black pepper to taste
3 tsp dried oregano
1.5 tsp minced fresh rosemary
1.5 tsp garlic powder (avoid powder that has MSG!)
sea salt/cracked black pepper to taste
4 boneless, skinless chicken breasts (serving size: 4.5 ounces per person)
4 cups arugula
2 tablespoons chopped fresh basil

Directions:

Combine the tomatoes, zucchini and cheese in a medium container.  Add the oil, vinegar, salt & pepper to taste, and mix well.  Cover and refrigerate until the chicken is ready.

In a small bowl, combine the oregano, rosemary, garlic powder, salt & pepper, and mix well.

Trim the fat off the chicken breasts.  Sprinkle the oregano mixture on both sides of the breasts.  Grill until done, OR:
        a. Heat a large skillet over medium heat, and coat the pan with olive oil spray.
        b. Once the oil is hot, add the breasts, 2 at a time to avoid overcrowding.
        c. Cook each breast 4-6 minutes per side, or until the center is no longer pink.

Once the chicken is done, let it rest for 2 minutes to avoid releasing juices.  Then slice each breast on the diagonal, creating strips of chicken.

Mix arugula and basil with the tomato mixture; arrange on a platter or in 4 individual bowls/plates.

Top with sliced chicken.

Cook's note:

I personally think that an entire chicken breast is too much meat for a serving, especially since chicken breasts seem to be growing bigger and bigger. I cook only two-three breasts, depending on size, and split them between the four servings. If you can find the nice small chicken breasts, so much the better.